Showing posts with label Projects. Show all posts

DIY Fall Family Tree

I LOOOOVE fall. The trees are GORGEOUS this year! They seem especially gorgeous because last year there was a very early frost and the leaves just fell off without turning colors. So I'm loving God's beautiful fall paintings this year!

My family decided to make something else this year and it was so much fun and very easy to do too! I found this on Pinterest. (Yup, SOOOO addicted!)


If you go here you will be taken to the site where you can download a beautiful picture of a painted tree for FREE!!! Can't beat that! They suggest using it for a wedding "guest book" and I think that is a fantastic idea. 
But I'm already married so not using that one! But what I CAN do is use it as a unique family tree! So I did. 

http://styleunveiled.com

I opened the image with Word (or you could use Picnik) and added our family name and the year.
I printed it out on cardstock and gathered my ink pads in Red, Orange, Gold, and Yellow. 

I gathered my clan together and we had a fingerprinting party. Each person got their very own fall leaf color and we put leaves on the tree! In the center of the tree the branches form a heart and my hubbie and I put our fingerprints there in the middle. It's not done this way in the picture yet in case you noticed but I wrote (very tiny) each person's name in one single appropriate fingerprint randomly. It turned our beautifully! I love it and will cherish it forever. 


Here is our very own family tree! I love it and I think we will probably do it every year - I saved the image of the tree on my computer in case they stop offering the free download. 

In HIS Grip, 
               
I'm linked up with: 
DIY under $5

Trash to School Desk!

I wanted school desks. I had no school desks. I had a table and that was fine but they weren't school desks. So I found some! I found two small tables that were left in the parsonage. I ALMOST threw them away but found random places to stick them so they would be useful. I'm SOOO glad I kept them!
BEFORE!!! 
They had been painted quite a lot so I did some research about paint stripping and it seemed to not be too daunting so I tackled them with paint stripper.
I slapped the stuff on and watched it do this! I was impressed - this should be easy! 
HA HA HA!!! Let me tell you - this was NOT easy! I scraped it off and it wasn't coming off. This stuff was ridiculous! After slathering on 3 layers of paint stripper and 4 chemical burns - this stuff eats through plastic gloves! I gave up and called a friend with a sander. I sanded that puppy down. Why I did not do that in the first place - heaven knows. God probably decided He would teach me a thing or two about patience and persistence. I don't think I got the persistence lesson though. To all who consider using paint stripper - think again and you will be glad you did. 
Here it is after being sanded (see the paint is STILL not all the way off!) and I started priming. 
AFTER! 
Here is the finished project! I was pretty pleased with how it came out and now it is no longer a trash possibility but it can be used for a desk for my schoolroom or if I find actual desks, I have a spot picked out in my hallway for this small table! 
post signature

This post is linked up with:


Domestically Speaking  DIY under $5   

DIY 0.99 Cent Pack of LOVE!

Hannah and Ann! 
My wonderfully wonderful friend Hannah has been laid up after having surgery and what does she do? She writes a guest post for my blog! I love that girl! Just so you could get a crystal clear picture of what kind of friend Hannah and I are - here we are. Jumping on a bed. In a hotel. It. was. HILARIOUS! So now that we have THAT established! Here is what she did for her sweetheart while all laid up! 

I did something AWESOME today for my hubby - and it only cost me 99 cents! Since my husband travels A LOT and is usually REALLY tired, he chews gum to keep him awake. I noticed when we were driving the other day he chewed his last piece of gum. I decided to do something to show my husband that I love him, and am praying for him when he is away. And of course, to show that you can do something significant for your spouse without spending a lot of money - in this case 99 cents for a pack of gum!
Supplies:  Pack of gum (I used Trident), scissors, an exacto knife or box cutter, markers, card stock, a pen or pencil to trace, and glue or double stick tape.


Step 1:  Take the paper packaging off the foil of the gum. Trace this onto your card stock. Be sure to also trace and cut out the lip that the flap goes into to "close" the gum.


Step 2:  Line up the paper packaging from the gum with your cut out card stock and fold together where the packaging folds. Make sure to crease your card stock.


Step 3:  Decorate your card stock (make sure that you write the correct way! The first time I did this, my words were upside down when I put it on the gum. :)


Step 4:  Glue or tape your card stock onto the foil of the gum package.


Voila! A personalized package of gum! You can also do this for party favors, or a women's event at church. One other thought I had was instead of Trident do Trinity - Cleans and Protects the Heart.


Thanks Hannah for your creativity! AND your very special friendship! I wouldn't know what to do without our occasional insane moments! 
post signature

I'm linked up with these AMAZING ladies at:
DIY under $5     

Jewelry Organization

I cannot figure out jewelry - I LOVE jewelry! On other people. I CANNOT figure out what looks good on me or what will go with what. I see jewelry on other people and I think - I can do that! Then I go and pick something out and I wear it with ONE outfit and I cannot make it work for any others! So I have resolved myself to simple and plain jewelry that I wear constantly and never have to take it off. Which works for me. BUT I still have all of this jewelry that I have bought and don't wear. 

So when I saw Amy's post on her Jewelry organizing project, I KNEW that it would help me too! So I duplicated hers, only I didn't paint mine because I liked it the way it was. I was satisfied until I wanted to just get rid of my jewelry box. I still had all of my earrings in it and needed a spot for them too! So I did some searching online and there were TONS of bloggers who made one using chicken wire and mesh and a splatter screen and all sorts of things but I wanted to do mine with what I had on hand and not buy anything. So here's what I came up with! 


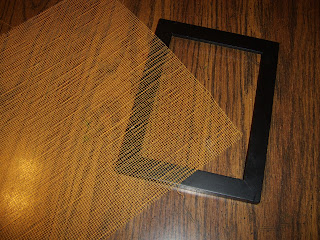
Here is a black frame missing the glass and a piece of scrapbooking paper is like paper mesh! I triplicated the paper and cut it to fit the frame and hot glued it securely. Then I took the whole thing and painted it gold to match my existing frame. It worked GREAT! I was a little surprised and wasn't sure if the paper would work very well but it was great for the earrings that I have. 


I just added the bow by using a pushpin to hang it above the frame - I also used pushpins to hang it because its so much easier to grab and replace it when I need to change my earrings. 
post signature
This post is linked up at: