
Making Christmas presents for this year is going well but as I said in the first part of this series, what I'm making is staying a secret until AFTER I give them to their respective owners! We would not want to spoil the surprise! This is a gift that I gave to the men in my life and I was actually surprised at how much they liked them! First of all I went shopping at Goodwill and other thrift stores for used hardback books. I chose books related to the recipients for example I chose books with titles about family for my dads and a Star Wars book for one of my brothers and "Treasure Island" for another one of my brothers. It's really fun to find books with titles about secrets or treasures or money because that's what these books are for!
You will need:
a HARDBACK Book that you are willing to not read anymore and at least an inch thick.
Glue
Water
Paintbrush
X-acto knife
pencil
Ruler or straight edge

First mix one part glue to one part water and mix well with a paintbrush. Decide where in the book you want to have the opening in your book begin. I liked to separate a few pages so you could not tell right away that there is a secret compartment inside. After you decide where in the book you want to start cutting, turn two pages and that's where you will start gluing. Clip the loose pages back and pull the book open. Using the paintbrush start gluing the sides of the pages holding the stack of the pages together firmly. You may need to glue the back to the pages but sometimes this in not necessary. After using plenty of glue on the pages of the book, go ahead and close the book (this is really necessary to close it to dry otherwise your book will dry in a funny shape and you won't be able to close it) which will allow one of the pages you wanted to cut to rest against the gluey pages. Allow to dry under a weight (I used other books). It really only takes a couple of hours to dry if that. When it is dry, see if there are any separations in the pages and glue those back down so the end result is a few pages loose in the front of the book, and a solid clump of pages attached to the back of the book.
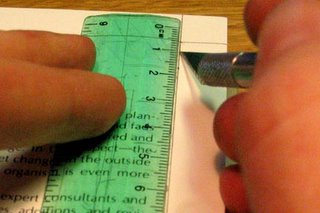
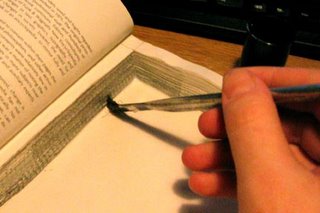
Still keeping the other page that you wanted to cut separated with the other loose pages, mark the top glued page with the opening at least a half-inch away from the edges of the book. Then it's time to cut! Using your knife try to cut as cleanly and as vertically as possible. For all of the books that I made, this was the hardest to do especially if the pages were very thin or if the book was really large. So keep that in mind when choosing books! Each book probably took me about 2 hours to cut so it was pretty painstaking work but I just popped in movies to help the time fly.
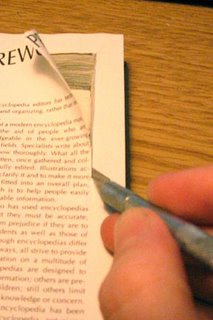
You can stop whenever you want to. I usually went to the very back of the book but sometimes I would keep pages on the inside of the hole. Or I would put an illustrated picture from the book that I had cut out and glued into the hole. After the cutting, make sure you remove all of the little scraps of paper. Now it's time to glue the inside edges of the pages. Make sure you don't have any major drips! After gluing the pages, glue the top page and take your remaining page that you wanted to cut and glue it down on top of your cut pages. Now close the book again and let it dry under weights again.
 Now open the book up again and cut the page that covers the opening. the reason for doing this is to even up the hole edges because that top page will get pretty scuffed up and marked up so it makes a pretty edge. Check to see if it still needs to dry and leave the book open at this point to let it dry. Then you can store or stash whatever you want to in there! For my dads, I put a picture of him with his grandkids glued to the inside so they could open it like a picture frame. You could actually make two holes - one for each picture on either side of the book and instead of bracing it closed to dry you could prop it open so it would stand open like a picture frame. If your book refuses to stay shut hot glue a ribbon to the sides of the book and tie it shut. The only problem with doing that is it makes it obvious that it's not a normal book. I got this idea from a friend of mine who gave me one of these as a gift and I found this site which also gives directions on how to do it. I made homemade taffy to put inside the books for Christmas but you could put anything in there to give them away! Are you making anything for Christmas presents? If so please share! :-)
No comments:
Post a Comment
Your comments are such a blessing and encouragement to me! If you have a question or comment that you would like to ask, feel free to comment below or email me at Ann@StringerMama.com! I look forward to hearing from you!